Remember,
to implement LCR you can only have one database per storage group. You
want to make sure you certainly have sufficient disk space for your LCR
copy. You can implement LCR in one of two ways—either during the
creation of the storage group or afterward.
Enable LCR on an Existing Storage Group
If the storage group already exists, perform the following steps:
1. | Open the Exchange Management Console (EMC).
|
2. | From the Navigation Tree, expand the Server Configuration work center and click Mailbox.
|
3. | From the Results pane, choose the server that has the storage group on which you want to enable LCR.
|
4. | Select
the storage group on which you want to enable LCR. (Note: If you select
a storage group with more than one database, you will not even see the
option to enable LCR.)
|
5. | From the Actions pane, select Enable Local Continuous Replication to open the wizard.
|
6. | On the Introduction screen, confirm the storage group name and database name, and click Next.
|
7. | On
the Set Paths screen, you are shown the default paths, but these are
generally to a local disk. You might allow this for testing purposes,
but it defeats the purpose of LCR. You want to relocate those to a
separate disk. Click the Browse buttons to relocate those paths to a
new disk. Then click Next.
|
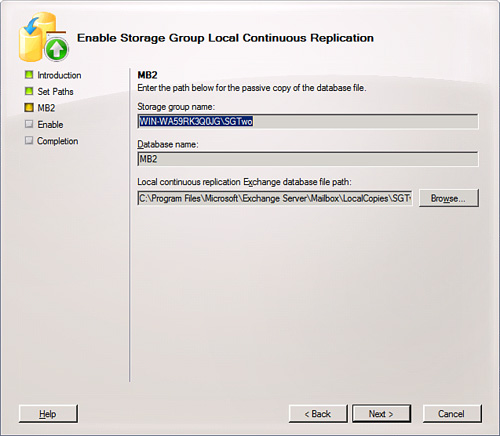
8. | You are shown the passive location of the database file (shown in Figure 1). Click Browse to alter this location as well. Then click Next.
|
9. | You
are shown a configuration summary of both actions: making a copy of the
database and making copies of the log and system files. Keep in mind
that the database is copied once. The way it is kept up to date is
through transaction logging and replaying into the database on the
passive side. After you confirm your settings, click Enable.
|
10. | When complete, click Finish.
|
What
happens next is a process called seeding, where your database is
created in the passive disk and this is the creation of the starting
point for your LCR version. After LCR is complete, you should notice a
change in the icon next to your storage group. Some new options in the
Actions pane for your storage group are to disable or suspend the LCR.
Note
An
easy way to confirm the functionality of LCR is to open the folder that
holds the active location of your transaction log files. Then open the
location of the passive copy of the logs. Through your Outlook client
or Outlook Web Access, send a few messages through to mailboxes within
that database. You should see the transaction logs grow on the active
side and then shortly afterward you should see the passive copy
increase, too. This provides a visual confirmation that LCR is working
just fine.
PS Note
The cmdlets through the Exchange Management Shell used to enable LCR on an existing storage group include two separate commands:
Enable-DatabaseCopy
-Identity <Server>\<StorageGroup>\<Database>
-CopyEDBFilePath:<FullPathIncludingDatabaseFileName>
Enable-StorageGroupCopy
-Identity <Server>\<StorageGroup>
-CopyLogFolderPath:<FullPath>
-CopySystemFolderPath:<FullPath>
Enable LCR for a New Storage Group and Database
We need to revisit the process:
1. | Open the EMC.
|
2. | From the Navigation Tree, expand the Server Configuration work center and click Mailbox.
|
3. | From the Results pane, choose the server where you want to create the Storage Group.
|
4. | From the Actions pane, choose New Storage Group to open the wizard.
|
5. | Using the Browse buttons, you can determine the location of the log and system files.
|
6. | Select
the checkbox Enable Local Continuous Replication For This Storage
Group, and then use the Browse buttons to determine the location of the
passive log and system files for replication.
|
7. | When you are ready, click New and then Finish.
|
This
completes the first part for creating a storage group that is
LCR-enabled, but the next part is the database. When you create the
database for the storage group, you need to browse for the location of
the active database and for the location of the replicated database.
When you are ready, click New and then Finish.
Verify LCR Is Functional
To
see how your LCR performs, there is a tab in the properties of the
storage group that shows you information regarding your LCR status. To
view that information, perform the following:
1. | Open the EMC.
|
2. | From the Navigation Tree, expand the Server Configuration work center and click Mailbox.
|
3. | From the Results pane, choose the server where you want to create the storage group.
|
4. | From the Work pane, select the storage group for which you want to see the properties.
|
5. | From the Actions pane, select Properties.
|
6. | Select the Local Continuous Replication tab, shown in Figure 2.
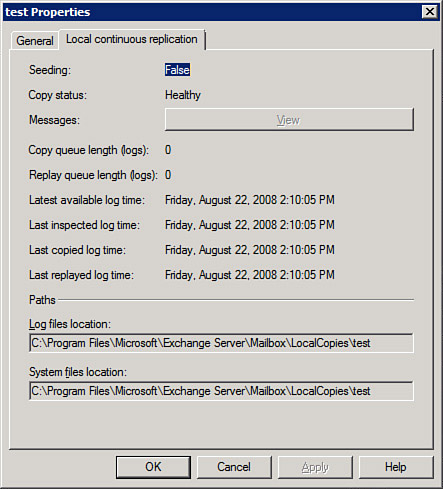
|
7. | Note the Copy Status is Healthy. If there is a problem, you might see Broken, Disabled, or Failed.
|
8. | Assuming everything is healthy, you can click OK to close the dialog.
|
Note
In
the event you do notice a problem with your LCR replication, you can
check to make sure the paths are all correct and accessible. If you
find a problem, fix it and then suspend and restart LCR on the storage
group. You might have a problem with a missing transaction log, which
sometimes causes LCR to halt. Try the Update-StorageGroupCopy cmdlet to reseed your LCR. However, if you need to find other problems, the following TechNet article will assist you: http://technet.microsoft.com/en-us/library/aa996038.aspx.
Recover from Disk Failure
Unfortunately,
there are times when your active disk might fail. With LCR you have to
manually intervene, but you can recover your working environment
quickly depending on how fast you are notified and how rapidly you can
respond to the failed disk.
The process requires three actions:
Dismount the database.
Alter
the pointer for the database to point at the passive copy. Note: If the
disk itself is not harmed but the database has become corrupt, you
don’t have the change the pointers; simply move the database over to
the production location and remount. If the disk went bad, you need to
alter the pointers.
Remount the database.
To perform these actions, do the following:
1. | Open the EMC.
|
2. | From the Navigation Tree, expand the Server Configuration work center and click Mailbox.
|
3. | From the Results pane, choose the server where the disk has failed.
|
4. | From the Work pane, select the database, and choose Dismount from the Actions pane.
|
5. | You
can activate the copy that has been moved to the production location or
activate the copy that is in the passive location depending on whether
the disk died or the database simply corrupted. In either case, you
will use the Restore-StorageGroupCopy cmdlet.
If you want to activate the copy that has been moved to the production storage group, so the paths are unchanged, type Restore-StorageGroupCopy -Identity:<Server>\ <StorageGroupName>
If you want to
activate the copy that is on the passive disk, so you will have the
indicate the alteration of the production path, type Restore-StorageGroupCopy -Identity:<Server>\ <StorageGroupName> -ReplaceLocations:$true
|
6. | Select the database and choose to mount it from the Actions pane.
|
Keep
in mind that LCR is no longer functioning on the storage group because
you just disabled it by switching to your passive copy. You have to put
in a new disk or simply configure LCR again to use the locations on
different disks that you have prepared in your system.